X
Subscribe!
Get the latest updates on SmartMan!
Subscribe!
Get the latest updates on SmartMan!


| CATEGORY | CONCEPT | |
|
||
Login vs Register When an activity is performed, all results for that activity are saved and thus attached to that login name. This has implications for retrieving that information at a later time. There are three different ways to login to SmartMan. All give you full access to the SmartMan activities, however, the differences will relate to what you want to do with the results once the activities have been completed.
Use Practice Sessions: This is the quickest way to login into SmartMan. With a single click, you are at the Main Menu and can select the activity you wish to perform. As many people as you want are able to perform under Practice Session User. If you use this login to have a class of 15 people to perform skills, all of their results will be stored in the Practice Sessions User. If at other times, you or another instructor also used the Practice Session User, then their results are in that login as well.
When you go to look at the results at a later date/time.
a) you will have to figure out which ones were associated with your class using the date/time,
b) there will be no way for you to know who performed which results unless you created a class list beforehand and recorded student details and their performance details,
c) you only have a copy of these results on the local machine.
CREATE A LOGIN NAME: This is also quick, but not as quick as simply clicking on Practice Session. This does not require access to the internet. Click at the bottom of the Login Window. Type in the name you wish to make and press Enter or Tab. Enter a password of at least 3 characters. We suggest 123.
There are now different ways to use the feature:
Class Name: You may wish to have all people perform the same activity within a single user such as a class name. This will put all of your results into a single area for this session and acts as a group identifier. For Example, for a morning sessions you might create a name such as Fire 10Jan where you have a class of fire department people. Then you might have another one for Lay12Jan for a group of lay rescuers. It will be quick and easy to find the results for each session so that you can quickly show results, product lists, make charts. In this information, you will not know who performed particular results.
Student Names: This alternative requires that you enter the name of each student. Click in the area at the bottom of the Login Window, type the person's name, press Enter or Tab, enter the password and confirm the password. At the Main Menu click on Login Next User and repeat. This takes about 15 seconds person student. When each student comes to do their skills on SmartMan, their name will be in the login area. That person clicks on their name, presses 123 for the password (or the password you used) and then performs the activity.
When you go to review results they will be associated with each student. With a single click of a button you can create a class list, with scores, with their names and the date of the activity from the results found within that class login. It is then simple to create a chart of those results with or without the names. If students come back to do activities at a later stage their logins are still there. You do not have to recreate the login. It is then possible to view all of the results of that person. You will also be able to view the results of that person over time.
REGISTER A LOGIN NAME. When you register a login name, that login is given an ID on the server. To register you must a) have an active internet connection, b) have a valid key code. Any login except Practice Sessions can be registered. Results from a registered user can be sent to the server as soon as they are completed or singly at a later time or later they can be sent as a group.
When the login is registered and you are in the activity, the results of that activity will be ranked with others results of that activity that were also sent to the server. This information is available when SmartMan is Online. You access this by pressing on the Online Results Button.
When you go to examine the results of registered users, you have full access as you would with any login which you created. You also have an archive of the results as they are on the server. The QCI module provides access to all of the results on the server. This allows you access to the results from anywhere you have an internet connection. It has a group of tools to allow you to sort and clean data, display basic statistics of the information, and to export the data for more sophisticated processing.
Feedback is what you see, hear or feel in response to what you do on the manikin. On SmartMan, the system provides accurate feedback as you perform skills. The feedback is given in a simple to understand colored bar. These colors are used for chest compressions and ventilations and are provided as the skill is being performed.
BASIC COLORS -
What do the colors mean?
Green for good (performing within the guidelines)
Red for too slow (in compressions your rate is too slow, in ventilations the rate of giving the ventilations is too slow)
Orange for too fast (in compressions your rate is too fast, in ventilations the rate of giving the ventilations is too fast
Open video in a browser | Play or download mp4
Download Detail on Colors For Compressions » | Download Detail on Colors for Ventilations »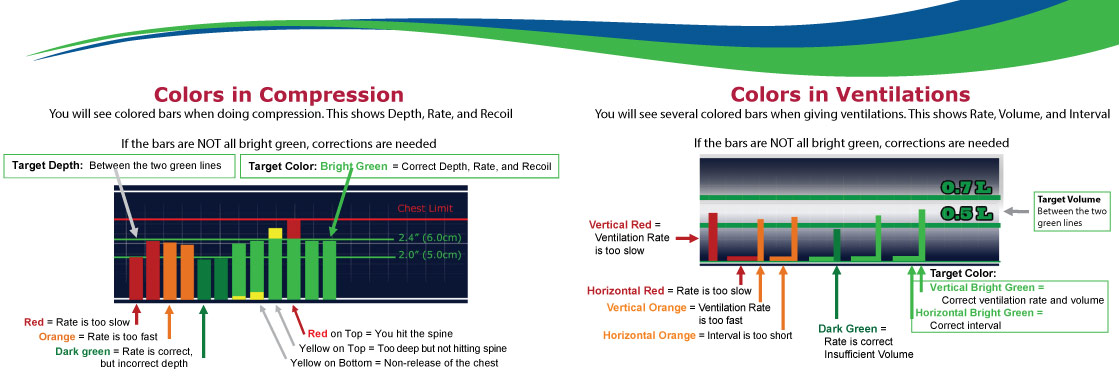
RESPONDING AS YOU PERFORM SKILLS
It is easy to see a string of a single color. You are able to modify your performance to change the color of the bars. Once you see the bright greens, focus on developing a feel for performing to that requirement.
HELP OTHERS - Coaching
With the color feedback it is easy to help someone else improve their performance. You can use the colors to coach a person to improve. Here are a couple of tips on how to coach:
* Do not over coach. Do not respond to every color. Wait until there is a pattern and then suggest that the student go deeper, or slower, etc.
* Correct only one issue at a time. If you are correcting depth of a compression, have that mostly corrected
before you coach them to correct rate.
* Use the PAUSE Button if the person is badly out of compliance and explain what they are to be doing.
SELF-TESTING - Turning the Feedback Off
Once a student is performing well, it is fun to turn off the feedback to see if they are establishing muscle memory for the correct motion. Select the activity, click on the Feedback Off Button. When the student performs, only gray bars will be displayed. This indicates that the program is working. When the activity is completed, the score and all of the analysis will be displayed.
An activity is what you do to perform skills. The activity follows specific protocols and skills have to be performed to the rules specified by the American Heart Association.
Skills Set Menu. All activities are located in the Skills Set Menu which is available once you are logged in. Many activities are available, depending on the version of the program you have purchased covering, Compressions, Ventilations, CPR, Tutor and ADV CPR. In the Tutor section, the activities help students improve specific sub-skills. The Advanced Airway CPR Activities and the Megacode options are in the ADV CPR Tab.
Results. Activities provide feedback on parameters which need to be performed correctly. When an activity is completed, each activity will display results; that is precise information on all crucial aspects of the performance during the activity. Most activities will produce a percentage score when completed. Once a result is displayed, you can re-start the activity immediately without going back to the Main Menu. Click on the Restart Button, then on the Start Button.
Activity Terminates. It is possible that you start an activity and the program will stop part way through. If the performance parameters are too far out of the defined parameters, the program will stop. If it terminates, no results will be saved. Here are two examples of where an activity would terminate:
a) If you are performing a 30:2 compressions test
and perform more than 34 straight compressions without pausing, the program will stop.
b) if you are performing 30:2 two person CPR and no air is given during the pause after the compressions, the program will terminate. You must achieve at least enough air to register.
Options. Activities have a number of options which can be accessed by clicking on one of the buttons that is displayed within the activity. Some of these buttons will provide additional feedback during the activity. Other buttons will display more information about the performance once it is complete.
Another Activity(Same Login): To choose another activity for the same login, return to the Main Menu (click on the Menu Button). Then select the new activity in the Skills Set Menu.
Another Activity (Different Login): Return to the Main Menu (click on the Menu Button). Select Login Another User. Have that person login and then select the new activity in the Skills Set Menu.
Skills are the criteria for performing an activity. Skills have to be performed within specific criteria which are set by an authoritative body. One such body is the America Heart Association. For example they set the parameters for what is a correct performance of chest compressions skills and ventilations skills.
On SmartMan you can reach the Skills Set Menu once you are logged in. This is the main window for accessing the various activities. Each skill area has a TAB which you click on. Then you select the particular skill you wish to perform.
If a skill is performed too far out of what is expected by the guidelines, the program will stop and provide a pop up saying that the skill has been stopped. You should restart the skill activity and correct the performance issue to be more in line with the current guidelines.
For example,
Sub-Skill: In order to perform CPR, you must learn how to perform several different things at once. These different aspects are called sub-skills. For example, simply being able to perform compressions to the correct depth but not being able to perform to the correct rate or not providing full release is not good CPR. Each of these are sub-skills which must be coordinated and performed correctly during the performance.
A code is a series of protocols performed by a team. For example a Megacode is a protocol established by the American Heart Association to define roles for response by a team to a cardiac arrest.
Codes require that the roles played by each of the participants are performed in specific ways at specific times in response to other events that are going on. They require mastery of the precise skills in order to produce a top quality code performance.
When the USB cable is connected to the manikin and the computer, data is sent from the sensors in the manikin to the computer. The SmartMan software is then able to calculate and display the information in a form that is easily understood. As the skill is being performed the information is streaming from the manikin to the computer and being displayed in real time.
What You Can Do When Connected: When connected you have full access to all features of your software and hardware interaction.
What You Can Do When Not Connected. That is when the USB is not connecting the manikin to the computer. There may be no USB cable, it may not be getting a good connection at one end or the other, it may be a faulty cable, it may be a faulty port.
At the Login Menu a window will pop up and say that the “Manikin is Not Found”. You can hide this window if you choose to continue to use features of SmartMan that are available when you are not connected. Even when minimized, there will be a small notification in the lower right of the screen written in red saying that you are not connected.
If you are not connected to the manikin you cannot perform skills.
PREPARE FOR CLASS: It is possible to create logins. These can be made quickly without having to connect the manikin and without having access to the internet. Type the login name in the space, enter a password. The password must be 3 characters or more. We suggest 123 for generic passwords. Confirm and then you are at the Main Menu. Press Login Next User to repeat the process for each new login you want to create.
Create A Single Class Login: Create a single login to identify this class. Type the login name in the space. We suggest that you use something identify that class such as FD9Septam (for Fire Department morning session of 9 September), enter a password. The password must be 3 characters or more. We suggest 123 for generic passwords. Confirm by typing the password in the second space and click continue. You are now at the Main Menu.
In class, login to that particular class login. Have all students perform their activities within this login. It is then easy to find their results and to keep their results separated from others. Note that no names will be on the results. The results will all have the same class login name.
Create Logins For Students: Simply type in their name as the login and give it a password. We suggest 123. Then click Login Next User and create another and so on.
If you choose to, you can register logins through the internet. You will need an active internet connection and a key code for this. See “how to register”
Access Results: You are able to access all of the results that have already been done on a computer without being connected to the manikin. You can review individual results, add comments on those results and save them to a file.
To access previous results, from the Login Menu, click on the login which contains the results which you wish to display. Then click the Previous Results Button. This will open a window. You can select the results to display by clicking on the particular skill (compressions, ventilations, CPR). If no results were performed in that skill the window will remain blank. If there are results in that skill, they will be listed. Each file has the login name, the date and a number on it. Click on the set of results you wish to view, then click on the Select Button at the bottom of the window. Those full results will be displayed.
You have full access to the results. All buttons will be active the same as if the results had just been completed. For example, you can review the performance of each cycle by pressing the Next Cycle Button. You can Examine the Summary by clicking on the Summary Button and in this window you can also add a comment to the file. You can print the report by clicking on the Print Button.
PRODUCE REPORTS:The SmartMan software contains several buttons that allow a trainer to produce various types of reports. The detail in the report and the ease of access is largely determined by the type of login you chose for the students to use. You are able to:
*
You can view and or print a report on any single set of skill results.
* You can quickly assemble all scores from a single person.
* You can produce a file with all results from the computer.
* You can zip results and send them to an email address.
* You can export the results to an Excel file to create a chart of the results.
See the results sections on the "How To" page for more detailed information on making reports.