X
Subscribe!
Get the latest updates on SmartMan!
Subscribe!
Get the latest updates on SmartMan!


| CATEGORY | HOW DO I ... | |
MENUS |
Start Up (connect, start, login) Menus & Buttons - Overview Menus & Buttons - Details Menus - Login Menu SmartMan Program Update |
|
Also there is a section with sample instructions that you can print and give to students. These are already created in Word format so you can easily modify them.
Print Instructions For Students:
PRINT: How to go to an Existing Login
PRINT: How to restart and existing activity
PRINT: Skills Completion Card
This is a series of things that you might want to do with SmartMan. Follow the instructions and you should get the result. It does not have much explanation as to why something is done a particular way. It aims to say do this and you get this result.
If you have something you would like to know how to do, please send us an email.
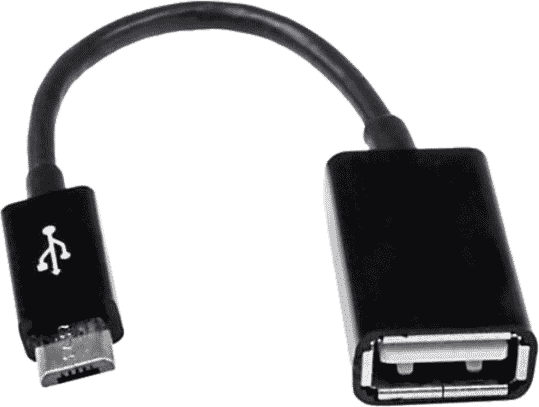
Connect: Connect the manikin to the computer with the USB cable. On the manikin, pinch the black piece in the center of the pop up. The pop up. will rise. The USB plugs into the side of the pop up.
Click Icon: Double click the SmartMan Icon. If the USB cable does not establish a connection, a window in the software will display a manikin not found error. You are able to use SmartMan with being connected to the manikin to create logins, view previous results, create lists, etc.
Login: Click on Practice Session. This should only take a single click. If your software has just started, it can take up to 10 seconds while the drivers load and the software is set up. Once loaded it will be quick.
You must be on v2.1 or later to be able to use this feature. To determine if you are using SmartMan version 2, it should have a the SmartMan logo and the number 2 as seen on the right.
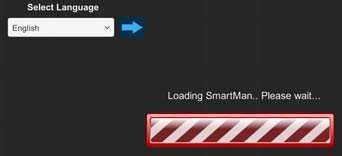 Select the Language: Click the little dropdown arrow, then select your language. If you are connected to the internet, it will verify that you have the latest updates for that language. It will try for 15 seconds and then load SmartMan program.
Next Time You Start: The next time you start, it will remember which language you selected last time.
The Blue Arrow: If you are happy with the language you selected, click the blue arrow and it will not check the internet for language updates.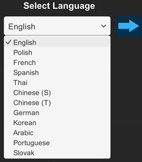
Each SmartMan Program has a version number. Each version has a specific maximum update number after whih it is no longer support. Please contact us if you are unsure. You can find at the login menu of the program.
If you have a version 1.0+ SmartMan, which you can find at the bottom of the login menu. If you do not see anything, hit the resize button and check again. Version 1.0+ SmartMan programs will only update up to ver 1.1.7. The manikin will not work with the version 2.0+ SmartMan program. Contact us if you would like to use the latest version 2.0+ program.
If you have a version 2.0 to 2.1 SmartMan, the program will only update to v2.1. You can find the version number at the bottom of the login menu. If you do not see anything, hit the resize button and check again. Please contact us to obtain the correct link to update to our latest SmartMan program.
If you have a version 2.2+ SmartMan, the version number will either be at the bottom or top left corner. If you do not see anything, please hit the resize button and check again. Press the update button at the right side of the screen and hit check then update if prompted. This should send you to the latest download link for your manikin via your browser. Please download and the open the installation file. If you have any question, please contact us.
Create your myQRCode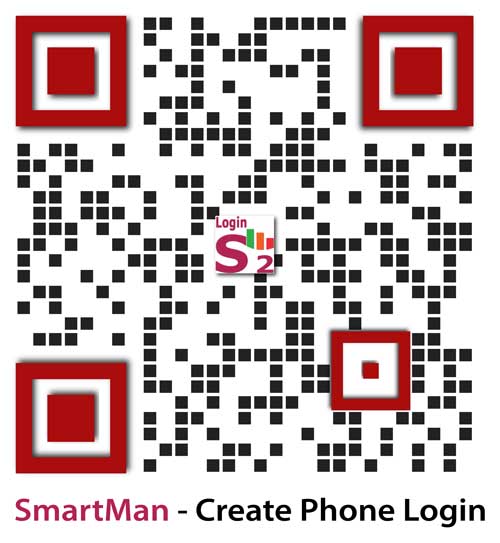
1. Scan the code at right with your phone
> Or copy and paste this address into your browser:
https://www.smart-manikin.com/QR/
2. Complete the short form
> You need an email which you pick up on your phone
> Enter your Email, Name, and Password
> Click submit
Use Your QR Code
On the SmartMan Software
> Click the "Scan myQRCode" Button
> Display your myQRCode to the computer camera show it shows in the popup window
All Done! Use SmartMan.
How do I … Login Using Practice Session
Click on _Practice
This is in the Login Menu. Click on _Practice and it will take you immediately to the Main Menu.
See a 60 second video: Open video in a browser | Play or download mp4
In the Login Window, all logins will appear. Find the login name that you want, click on it, enter the password and click continue. HINT: If you have a large number of logins in the login area, type the first letter of the login name you want to find. (It is case sensitive). The Login area will display those names which begin with that letter.
See a 60 second video: Open video in a browser | Play or download mp4
See a 60 second video: Open video in a browser | Play or download mp4
Creating a class is designed for use by a trainer, therefore it is under the Trainer Tools Button. To see this Button, login as any user. The Trainer Button is on the right side of the window. You can have the manikin connected but it does not have to be connected to create a class with logins.
NOTE:
Creating a class is the same as using the Group Login Tool to create student logins but with one difference. You add a comma and add a name after teh password; thus the format is name,password,class. That name will be the Class name. Class names will be converted to all lower case and will have all spaces removed when you click on the Check Logins Button.
Procedure to create a class.
Details On Entering the Names
Check Logins Button
Create Logins Button
See a 80 second video: Open video in a browser | Play or download mp4
Students can only be placed into a class at the time when the student login is created. This is done in the Trainer Tools section under Login Tools, Group Login. Student names can be added when the class is made or at anytime later.
See a 80 second video: Open video in a browser | Play or download mp4
If you only want to identify the class and have all students do their practice in a single login, type the generic login, type the password, type the class name. When you go to give the class, students will all use that class. All of the student results will be saved under that login for that class. There will be no individual student names in the file becauwe you did not create them.
Procedures
Open video in a browser | Play or download mp4
If you already have a list in Excel or Word you can copy and paste the list into the Group Login Window. However, you must be careful to make certain the FORMAT is correct before you paste it. Here is what you have to do:
Special Format To Transfer a list of names from MS Word
It must have a special separator at the end of each login. This means that there will be NO returns in the file so it will be a list which is in a single line. It can be very long, that is okay. The terminator must be the vertical line |. Here is an example of the way a list would look.
The list can also be without any hard returns so that it is a single long line. For example the above list would look like this:
Both of the above formats are correct. When you paste this list into the Group Login window, it will display as a single long line. When you click on the Check Logins button it creates the list as you wanted. If you have a long list of names in Word, it is easiest to do a search and replace on the return marker. Replace all return markers with |.
The Check Logins Button
When you work in the Group Login window, before you can create the logins, you must first press the Check Login Buttons. This will verify that the format is correct. It will put in the password if it is missing. The following are valid logins but they will create different tyes of logins.
If you specify a class, and the class already exists, the Login will be put into that class.
If you specify a class, and the class does not already exist, the class will be created.
Transfer a list of names from Excel
If you copy and paste directly from Excel, it will not have the commas or the required terminator. To copy the list it must be in the format:See a 2 minute video: Open video in a browser | Play or download mp4
See video on copy a large list of names: Open video in a browser | Play or download mp4
Putting student login names into a class helps to organize results. This makes it much easier to find the information later. It also makes it much easier to produce the lists that you want and to convert those lists and scores into a graph.
Creating a login within a class organizes student results for the trainer and for the SmartMan program. The SmartMan Classes Feature allows the trainer to:
Select Particular Class
When the Login Menu is displayed, there is a Select Login Button with a blue arrow located at the top of the main SmartMan window. Click on this to produce a list of all class. This gives you a list of all of the student who have logins in that class. You can click on any student login to display see their results.
Return To Display All Logins
If you have displayed a class and the students in that class with the above step, you may want to return to the original Login Menu which display all logins including those in each class. When in the Select Class drop-down, click on All.
See Students In A Class at the Login Menu
Go to the top of the Login Menu. Click on the Class Label. It will sort all of the login names. The students in each class will display together. If you have many students you will have to drag the scroll bar down to see the ones you want.
When the Login Menu is displayed, there is a Select Login Button with a blue arrow located at the top of the main SmartMan window. Click on this to produce a list of all classes. This gives you a list of all of the student who have logins in that class. You can click on any student login to display see their results.
You can add new students to a class any time.
Select The Class
When the Login Menu is displayed, Click the Class Drop Down Button beside the Help and Quit Button (top of main window) to produce a list of all classes. This gives you a list of all of the students who have logins in that class.
Choose Which Results
The All Results Window (password required) allows you to select the results which you want to view. You can select by skills or by date. When you have done this, click the Export and View Button. This will bring up the student list in Excel or the default program set to open a comma delimited file. You can select what you want to print or make a chart of the results.
Print The Class List
Clean up the file as you wish. When it has the list that you want, simply print the file or save as a pdf. You will have a list of the student names, scores, which class they were in, which activity they performed, the date it was performed and any comments you might have added to the file.
See a quick video: Open video in a browser | Play or download mp4
At Login, select the Class in the drop down button. It will display all of the people who have logins in that class. If a person chooses to login through the class dropdown, this puts the focus on that particular class. This means that the program is "looking" at the class as a group.
Once logged in, you are at the Main Menu.
If You Are At The Main Menu
If An Activity Has Just Been Completed
If An Activity is Ongoing
If You Are At The Main Menu
From within any activity, click on the Menu Button at the top the window.
Click on the Metronome button. This tool is to help those who are having trouble getting the rate of chest compression correct. It is only available in an activity which includes chest compressions. The default rate of the tool is at 110 beats per minute, but the user can select from 80 to 140 beats per minute to demonstrate how fast or slow other rates are.
See a quick video on metronome: Open video in a browser | Play or download mp4
Feedback Buton tool turns on/off SmartMan color real time feedback. Click on the Feedback button to test your skills!
With the feedback turned off, the bars only indicate that the system is active and working, but the bars are all the same height and color. When the activity is complete, the full color bars will display along with the score and the full results. This feature is a great way to test yourself to see if you have developed a proper feel for performing correctly.
See the feedback button in action: Open video in a browser | Play or download mp4
Ventilation is an important skill to develop. There are different protocols for different situation, so SmartMan developed different activities to practice the skill, from rescue breathing, to CPR ventilations, or ventilation tutor to get started.
Take a look at the video for more details. Open video in a browser | Play or download mp4
Previously called Cerebral Perfusion as Fraction or Hands-Off Time
What Cerebral Perfusion refers to in the program is a visual display of blood perfusion or flow to the brain, based on research that shows it takes at least 10 or more consecutive high quality (correct position at correct rate, depth, and no recoil) compressions in order to physically pump blood thru the heart and the brain. The color bar that appears correlates to time. Each tick that appears visualizes how much blood flow was achieved, with bright green designated for the color to achieve for a good flow rate that will improve patient outcome. Click for a detailed information on Cerebral Perfusion.
Take a look at the video for more details. Open video in a browser | Play or download mp4
1. Click on the Guide Button.
This will describe what is expected from the student for this activity.
Click the Guide Button again to hide it.
For most activities, once they have finished you will see a score. Activities must be performed to within certain limits. If you complete all of the skills within those limits, you will receive a score and then you are able to review the results. If the skills in an activity are performed too far outside of the limits, a window will appear and indicate that the activity has been stopped. No results for that activity are saved and the results cannot be reviewed.
In a code activity (Megacode) you must click on the "Stop" Button to end the code in order to see the results.
You can stop an activity at any time, simply click on Restart.
If you click on the Menu Button, the activity will be stopped and you will return to the Main Menu.
If an activity is stopped, no results are saved.
You can pause an activity by pressing the pause button. The activity continues but in pause mode.
When you click unPause, you can continue with the activity.
When you reach the end of the activity, you will see the score and the results will be recorded.
Pause will influence some of the playback features.
From within any activity, click on the Quit Button at the top RIGHT of the window. This will close SmartMan Program. You will not be prompted to confirm.
When the results of the previous person are displayed on the screen, you can click on the Restart Button, then click on Start. The same activity is ready to go. The results, and your score, will be saved under the current login.
If you want your results to be saved under your login name, go back to the Main Menu, Click on Login Another User, and Select your own Login Name.
Click on the Menu Button at any time. This will not ask you to confirm. It will take you directly to the Main Menu. The Menu Button is at the top of the window about the middle.
The Special Manikin
You must have either a SmartMan ALS LV or SmartMan Megacode LV manikin or RSIM to be able to perform this protocol. The name of the product above the Main Menu will display (LV) if your product has had this change made. The special features of this manikin gives the tidal movement of air in relation to the compressions and release of the compression, timing for pushing air into the lungs with a BVM in relation to teh up and down movement of the chest, pressure sensitive opening of air into the stomach, and total timing of both the chest compression and ventilation. These are required to learn how to use this protocol to provide optimal value to the patient.
Why and How
LV was developed in response to the research that indicates quality of chest compressions and time on the chest are the key factors which correlate to survival. The LV protocol reduces interruptions by providing a ventilation on a non-intubated patient as chest compressions are also ongoing. Some protocols also focus on reducing the Peri-shock time without chest compressions. To dowload a detailed written description, click here: pdf on using low volume protocol.
Practicing on SmartMan
SmartMan measures and displays the volume of the air generated on release of the chest together with the small amount of air generated by the BVM on release of the chest. This interaction between the person performing the chest compressions and the person using the BVM is necessary in order to get the timing, volume and rate of air flow correct.
There are 3 videos related to LV Protocol
See 3 Short Summary of LV Protocol: Open video in a browser | Play or download mp4
See video on why and how to perform LV: Open video in a browser | Play or download mp4
See video on practicing LV on SmartMan: Open video in a browser | Play or download mp4
When logged in, in the Skills Set Menu, click on AdvCPR. The code activities that are available in your program will be here.
Start: When you start the code activity it will continue to run until you press the Stop button. The only exception to this is if you do not do anything after pressing Start for 45 seconds.
Pause: If you wish to explain a point and thus interrupt the running of the Megacode, we suggest that you press the Pause button so that the timing and events are not recording the explanation.
Buttons in the Middle: Buttons related to establishing an IV, Drug Therapy, and Heart Rhythms will mark the event in the Events Log and will become a part of the After Action Report. These buttons are in a row on top of the feedback area. Only click these buttons once and they will mark that event in the log. You can either click on the button or press the associated key on the keyboard.
Buttons around the edge of the window turn features on/off. Click the button once and a window will appear. Click the button a second time and it will disappear. For example you can display the Event Log or not. You can display the Health Status of the patient in real time in response to the skills being performed or not.
Results on Screen: When the code is completed, different sets of buttons appear. Click on these to see an analysis of the quality of skills performed.
After Action Report: Click the Print Button on the right side of the screen when the code has been completed. This will create a report of the code.
Example showing the SmartMan software in running of a basic code.
This is a quick overview of the use of the various buttons: Open video in a browser | Play or download mp4
For detailed information on specification and login, click HERE.
For detailed information regarding the main page, click HERE.
For detailed information about various protocols (including low volume), click HERE.
For detailed information concerning megaocode activity screen and running the code, click HERE.
For detailed information pertaining to megacode results, and printing after action reports, click HERE.
For detailed information referring to improving scores, using different logins, viewing previous results, converting html file to pdf, and sending the results, click HERE.
The Megacode activity is designed to improve how a team works together and to improve the skills performed for each role in the code. It also proivdes trainers with a critical events log to keep track of when key events happened. These will be included in the After Action Report and marked in each stage of the code. During the code and after the code, click on the various buttons to turn features on and off. For example, if you wish to see the Events Log during the code, click that button. You will see the specific events and a time marker when they occurred. The following videos will help you understand what the buttons do.
Example showing the SmartMan software in running of a basic code.
This is a quick overview of the use of the various buttons: Open video in a browser | Play or download mp4
For detailed information concerning megaocode activity screen and running the code, click HERE.
Intubation is a critical skill to develop. With SmartMan Manikin, you can practice intubation in various scenarios such as intubating while chest compressions are being preformed.
The video will navigate you through the intubation tutor activity: Open video in a browser | Play or download mp4
You must have the correct SmartMan hardware to run the Baby and Neonate CPR training systems. The software can be installed on any PC computer. Use the link you were given and then update the software. Updates are free and you should update regularly as these include the latest fixes and features which users have suggested.
If you download the software onto a stick, COPY the software onto the PC that will run the program before you install it. Then plug in the infant. Then install the software. Both of these steps are important and should be done in order:
Using the Software
The infant software works the same as the other SmartMan programs. If unsure, please see the other sections above on how to login, create classes, print reports, etc.
The various compressions protocols are reached when you are logged in and at the Main Menu. Select the Activity you wish to perform by clicking on a Tab in the Skills Set menu, then click on the Activity.
If you are unsure of what is required in the protocol, when you click to enter the Activity, click on the Guide Button on the far left of the screen. There will be a brief description of the protocol used in that activity. Click the Guide Button a second time and it will be hidden.
The chest should be compressed from between 1/2 to 1/3 the depth of the infant. The feedback area at the bottom of the screen will indicate the correct depth. Protocols for an infant and neonate vary so please check the Guide.
If you are unsure of the meaning of the colors, click on the Key Button at the right side of the screen.
Perform the protocol and you will see your score.
See a short video on Chest Compression Activities: Open video in a browser | Play or download mp4
The various ventilations protocols and tutor activities are reached when you are logged in and at the Main Menu. Select the Activity you wish to perform by clicking on a Tab in the Skills Set menu, then click on the Activity.
There are several different protocols and thus different skills required for providing optimal ventilations to a neonate and baby. For example you can practice Rescue Breathing and there is a special Activity to help improve providing two breaths during CPR. There is a Ventilations Tutor to help develop the skills of providing small volumes of air at the correct rate. Each of the above can be practiced on different size lungs. See below on how to digitally set the lung capacity.
If you are unsure of what is required in the protocol, when you click to enter the Activity, click on the Guide Button on the far left of the screen. There will be a brief description of the protocol used in that activity. Click the Guide Button a second time and it will be hidden.
See a short video on Ventilation Activities: Open video in a browser | Play or download mp4
How do I … Change the Lung Capacity
SmartMan allows you to digitally set the lung capacity of the infant. This allows you to practice CPR skills on different size infants.
To change the lung capacity, you have to be logged in, then select Tutor and one of the Activities. On the right side of the window click on the Capacity Button. This opens a window with a slider.
Recommended settings
Neonate: -1 to 0: -1 is very small and 0 is a normal 4 week old.
Pediatric: 0 to +1: 0 is a normal 4 week old +1 is a large 51 week old.
See a short video on Changing Lung Capacity: Open video in a browser | Play or download mp4
How do I … Get Started with MultiManikin Viewer (MMV)
The MultiManikin Viewer module is designed to be used by an oversight person. It allows a trainer or supervisor from a single device to view many different people at the same time when they are using SmartMan
Before We Start
To Setup the MMV Please Follow the Steps Below In Order
ON the Facilitator/Supervisor's Computer
ON the SmartMan Manikin's Computer
For a printable version on how to setup: Printable PDF
See a short video on Using SmartMan Facilitator: Open video in a browser | Play or download mp4
How do I … Compare My Results with Others
You need to be connected to the internet to do this. You can do this:
A) As soon as your results display on the screen, or
B) By previous results which were completed at an earlier time, or
C) During a training session.
A) As soon as Results are Completed
B) Previous Result Completed at an Earlier Time
C) During A Training Session
If you are the trainer:
If an activity has just been completed and you are on the results screen
To view the comment, you must a) come back to the summary of the results, or b) view the results by pressing the All Results Button.
Open video in a browser | Play or download mp4
To view the previous results of a user
Check out the short video on viewing previous results: Open video in a browser | Play or download mp4
Result export is password protected, please contact your admin or SmartMan regarding the password
This is available at the Login Menu and is a Trainer Tool Feature. It is on the right side of the window. The window shows all results. If you have thousands of results, it takes time to create this list. When the All Results window opens, you can filter the results by All Results, Comps, Vents, CPR, Code. You can also Export & View. This opens Excel with the results display and from here it is simple to produce a chart of the results.
There is an Export Data Button. This will create a csv file (comma delimited file) of the results which are displayed. A csv file can be opened directly in Excel so it is easy to convert this data into a chart of the results.
All Results In A Class
See a quick video on exporting results: Open video in a browser | Play or download mp4
To generate a report, select the desired result as outlined by Previous Results.
See a quick video on generating a detailed report: Open video in a browser | Play or download mp4
Many of the Buttons in SmartMan are active without being connected to the manikin. You are able to create logins, view previous results, or assemble results to print when not connected. This makes it possible to take the computer back to office without having to take the manikin. NOTE: If the manikin is NOT CONNECTED, you cannot perform any of the activities. Below are a couple of examples of functions that are active even though the manikin is not connected:
To access the buttons and function without the manikin:
HOW DO I … Make a List of All Results
You can quickly make a list of all of the results that are on the computer.
The results which you have in the window will be exported. The location of the file and the name of the file will be displayed in the All Results window, just in case you want to go to that file. The comma delimited csv file will also open Excel or Open Office(you must have either program installed on your computer for this to occur). Alternatively you can locate the file and copy it to a computer that has Excel.
By putting student names into a class you can quickly create a list of all students and their scores, or show an average score for that class.
Select the Class from the Class drop down. This puts the focus on that class, that is, you are now looking at logins and results for that class ONLY.This will create an Excel spreadsheet of the result which you want with the focus on those members of that class only. From the All Results window, you can limit the results by date or by skill and activity, then click Export and View
See How To Make a Chart of Results to display this list in a chart in Excel.
All results are stored with the login name. No results exist without a login name. If you used the _Practice User, then the results will all start with the name _Practice. If you create a login name, regardless of whether it is registered or not registered, the results of activities that are completed will be stored under that login name.
Each result file will be listed with the name, an identifier for the activity performed, the date it was performed and a number. To create a class list with names and dates and scores,
You can easily get rid of any results which are not from that class. Simply delete the row. See How To Make a Chart of Results to display this list in a chart in Excel.
CREATE A CHART IN EXCEL: When you export the results from SmartMan they will open in Excel, if Excel is installed on the computer. Alternatively, you can copy the results file and put it on a machine with Excel installed.
In Excel the first row will be descriptions of the content that is in each column.
In Excel each row represents the information on each person. It will have their name, score, which activity they performed, the date and a comment if any.
In Excel each Column is a field.
In this example we want to make a chart of all scores. Here is what you do in order to put the results into a chart.
Create An Ordered Chart (with scores but without names)
Make sure the column with the scores is highlighted, click on the INSERT tab, click the bar graph.
Create An Ordered Chart with Names
To Put the Names on the Bar Graph, go back to step 3b above. Now highlight fields with both the names and the scores (columns 1 and 2). Select the bar graph. Once you have the bar graph displayed you can grab the corner of the graph to stretch it so that it is larger.
Add Style to Your Graph.
Exactly which buttons that are available will depend on the version of Excel which you have, the Bar Graph
You do not need to be connected to the manikin to create a login. You can put in your class list before class, or you can have students create their own login.
In Trainer Tools, you can create a zip file of all of the SmartMan results on your computer and send them to an email address.
See a 40 second video: Open video in a browser | Play or download mp4
Requirement to go SmartMan Wireless
Installation Steps
Window System Bit Type
Click HERE for a PDF file about the requirements and how to install the programs.
Step 1: Get and install the software - Download and Install Software
Step 2: Get the network running - Connect to or Setup a Network
Step 3: Make it all work together - Ready to Go Wireless
Requirement to setup SmartMan Wireless
Step-by-Step Setup Guide
Click HERE for a PDF file concerning setting up the devices after installation of the programs.
Videos to help Click HERE for a PDF file concerning setting up the devices after installation of the programs. Videos to help Troubleshoot • Right click on USB Hubs and make sure "Auto-Find Hubs" is checked. Make sure the Android device and the computer are on the SAME network. Make sure your Android device and the cable cord supports USB OTG (On-the-Go). • You can create a Wi-Fi hotspot or portable hotspot with your Android device. This is the preferred method of connecting if no wireless network is available. Refer to PDF on Creating Hotspot for details. • In VirtualHere USB Server app, go to option (3 dots in a line) at the top right corner, make sure to check "Keep wifi on" and "Keep awake" • In VirtualHere client, right click the manikin device and click "stop using". Right click again and click "use" to reset the connection. It is HIGHLY recommended to use a network already available or create a network via Android Hotspot instead of using Ad-Hoc as Android device is known to disconnect without notice from network without internet access. Refer to PDF on Setup HERE
Step 1: Get and install the software - Open VirtualHere USB Server app on your Android device
Step 1: Get and install the software - Download and Install Software
Step 2: Get the network running - Connect to or Setup a Network
Step 3: Make it all work together - Ready to Go Wireless
• Windows computer have the ability to create a network called Ad-Hoc that your Android device may use. This is not a recommended method of connecting. Refer to PDF on Using Ad-Hoc for details.
Refer to PDF on Hotspot HERE
Refer to PDF on Ad-Hoc HERE